Manual Mode
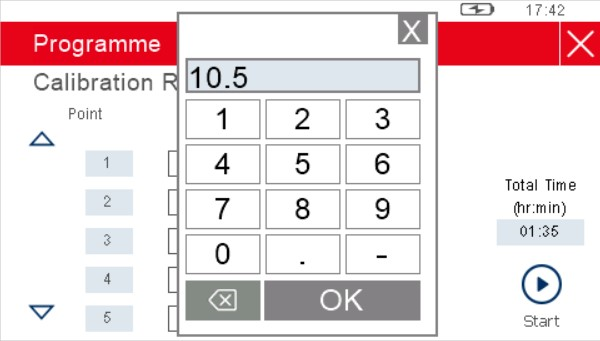
When the Operating Mode is set to Manual, the chamber will continually generate the currently selected set point. The set point is determined by touching the 'set point' indication on the Main Screen, which brings up a window allowing the desired value to be entered.
Automatic Mode
In order to program a calibration routine to run automatically, the operating mode should first be set to Auto from the Calibration Settings Screen -> Mode.
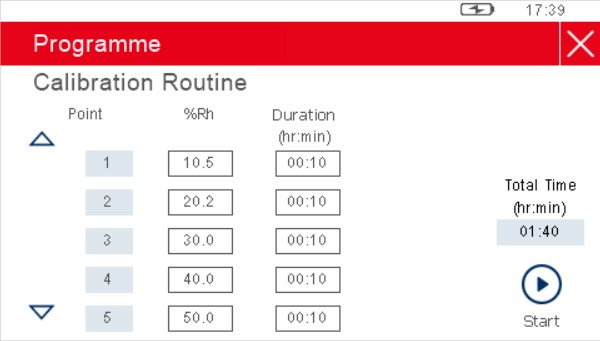
A calibration routine can then be defi ned, through the Calibration Settings Screen -> Program. Each point in the calibration is listed by row. Touching the up or down arrows on the left of the list will scroll through the 10 points which can be assigned.
Each row contains a relative humidity value in %, and a duration in the format HH:MM. For each row, the target relative humidity value will be maintained for the duration.
NOTE: The duration does not include time taken to reach and stabilize on the target. The duration time starts to count down once the measured RH value has been stable to within ± 0.5% of the set point for 20 seconds.
Consider the example calibration routine and its visualization in the chart.
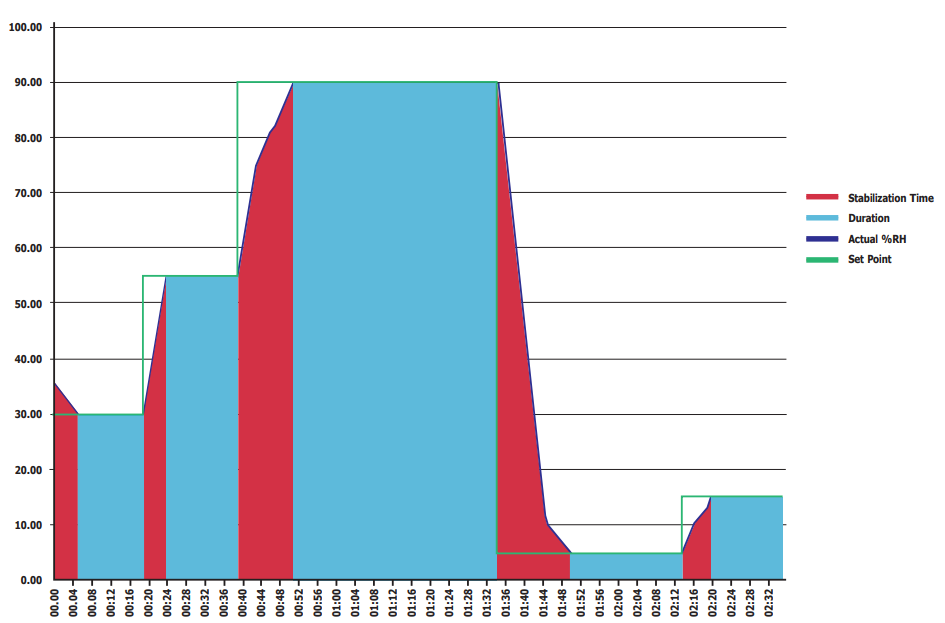
The time taken for the chamber to respond to the set point is shown in red fill - this is not included in the duration for that set point, which is shown in blue fill.
When the step change in humidity is large, the chamber will take longer to reach the set point. It will typically take much longer to dehumidify than to humidify, so the transition from 30% to 50% will be quicker than 50% to 30%.
Operating Practice
To perform a reliable humidity validation, it is important to follow these basic guidelines:
When starting a validation routine, ensure that the temperature of the environment you intend to operate in is stable, and that the HygroCal100 has been in the stable environment for enough time to reach temperature equilibrium with its surroundings.
If the HygroCal100 is not allowed time to stabilize with its environment, then the conditions that each probe under test experiences may not be the same. Due to the key influence temperature has on determining relative humidity, validation errors would result.
For example, at an ambient of 23°C and a set point of 40%RH, a difference of 0.5°C could affect the RH by up to 1.25%. At lower humidity the difference can be even more significant.
When running a validation routine, it is usually advisable to start with the driest points first and increase the humidity.
There are several benefits to this:
•Speed of transition - it is much quicker for the chamber to add humidity than to remove it, therefore a validation running from dry to wet will require shorter transition and stabilization times than one running from wet to dry.
•Service life of desiccant - repeatedly asking the chamber to dehumidify will result in a much shorter desiccant lifetime than if the cycle is run so that humidity only needs to be added.
Always ensure, when installing probes into the chamber, that the port adapter used is of the correct diameter for the probe body, so that there are no potential leak points.
Humidity Stabilization Times
The time taken for the HygroCal chamber to stabilize after a transition will depend on a number of factors:
• Magnitude of the humidity change
• Direction of the humidity change
• Temperature of the operating environment
The HygroCal is intended primarily to generate between 5 and 90% RH. Generally, transitions either from 5 to 90%, or from 90 to 5%, can be achieved within 20 minutes. All step changes between these two points can be comfortably achieved within this time.
Special precautions need to be taken when it is necessary to generate 95% RH - the system will require approximately 2 hours and 30 minutes to achieve full stability.
Data Logging
The logging function, when active, will continually capture the the target set point in addition to the readings of the internal reference and all probes under test. This will be written to the internal memory as a CSV file.
The files are identified both by number and by the name assigned as the log is initiated. The Log Files Screen allows multiple files to be selected and downloaded over the HC100A ServiceTool.
Standby Mode
Standby mode can be activated through the Calibration Settings Screen -> Mode. When it is active the pump will shut off and the unit will not control the chamber condition.
External Reference Configuration
It is possible to define one of the devices connected into the chamber as an external reference. The readings of this device will be displayed as the reference readings on the Main Screen. However, the internal reference will still be used to control the chamber.
When choosing an external reference, the port to which it is connected must be selected. The range and input settings which were previously set for this port will be loaded, but fields to change them can be found on the Calibration Settings Screen -> Ref Setup.
An external reference must be connected in order to carry out a calibration correction of the internal reference.