The alarm scheme setup tool is a function to generate alarm limitations that are frequently used.
Important features:
1.Programming alarms via the alarm scheme reduces the risk of error when each measuring point in configured independently. Rotronic recommend either working with alarm schemes or alarms on the measuring point, but not on both.
2.All alarm triggers are based upon the company time zone.
3.The notification work hour settings are based upon the company time zone.
Alarm scheme |
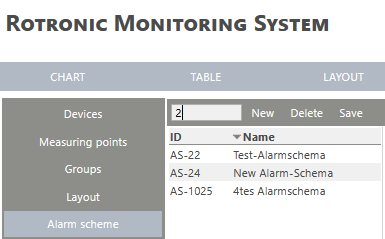
The user can select what to do: •New: Add a new alarm scheme (Each alarm scheme will have a unique ID: AS-xxx). •Delete: Delete a group. •Save: Save the configuration. 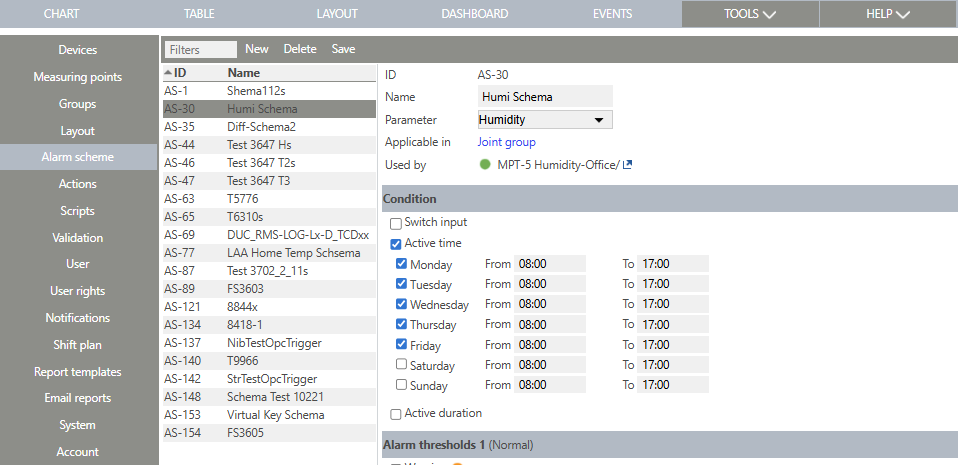 |
|
Alarm scheme |
When the user selects new, the name for the new alarm scheme can be added. Rotronic recommend adding a name that is easy to recognise afterwards. 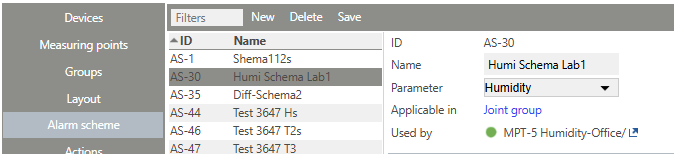
|
|
Alarm threshold |
When a new alarm scheme has been added and selected the user has various options: •ID: AS-xxx automatically given by RMS. •Name: User configured alarm scheme name (Recommendation: application monitored + limits + unit: Fridge 2...8°C). •Applicable in: User configured group where the alarm scheme is applicable. •Used by: Once a measuring point alarm has been configured, its name will automatically appear here.
The user can then set the condition, alarm threshold 1 and 2. 
Update V2.8.0: Searching, filtering and sorting of an alarm scheme The alarm schemes can be searched, filtered and sorted. Tools > Setup > Alarm scheme Enter the AS-ID into the filter to find the correct AS of the alarm scheme.
|
|
Condition |
When the user selects the switch input and active time tick box under conditions then the user has various options: •Switch input: oMeasuring point: User configured switch (virtual (0/1) or tristate (-1/0/1) button: Tools>Setup>Measuring Points Explained). oCondition for alarm thresholds 1: when these conditions are met, the alarm threshold 1 will be triggered. ▪In the first step, the user decides between less <, equal = or greater > than the switch status. ▪In the second step, the user decides the switch status tristate low (-1), tristate mid (0) and tristate high (1). oCondition for alarm thresholds 2: when these conditions are met, the alarm threshold 2 will be triggered. ▪In the first step, the user decides between less <, equal = or greater > than the switch status. ▪In the second step, the user decides the switch status tristate low (-1), tristate mid (0) and tristate high (1). •Active time: oStep 1: the user decides which days should be selected for alarm threshold 1 by ticking the box. Important: the times given must correspond to the time in one day and cannot overlap multiple days, so the from time must always be lower than the to time. oStep 2: the user devices at what time during the day should the alarm threshold 1 be triggered by add a from to to time. oAll times outside of threshold 1 will be triggered using the setup from threshold 2.
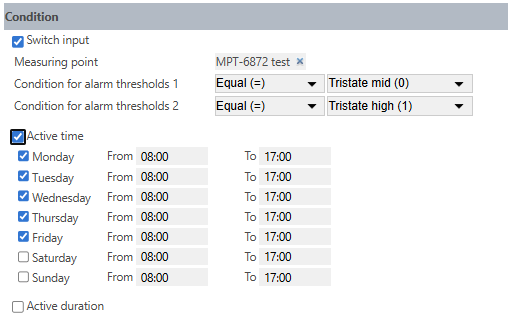
Update V2.8.0 Active duration A new setting "Active duration" is implemented. A start time, a stop time, an active and passive duration can then be configured.
|
|
Alarm thresholds 1 |
When the user selects warning and alarm tick box under alarm threshold 1 then the user has various options for both warnings and alarms: •Lower limit: User configured low limit. •Upper limit: User configured high limit. •Hysteresis: User configured hysteresis. Understanding Hysteresis. •Delay: User configured delay. •Notification delay: User configured notification delay. •Action: User configured action. Tools>Setup>Actions Explained. •Escalation: Tick box automatically not set but can be user configured. oEscalation level 1: User configured time (in minutes hours or days) and action of the alarm escalation. oEscalation level 2: User configured time (in minutes hours or days) and action of the alarm escalation. oEscalation level 3: User configured time (in minutes hours or days) and action of the alarm escalation. 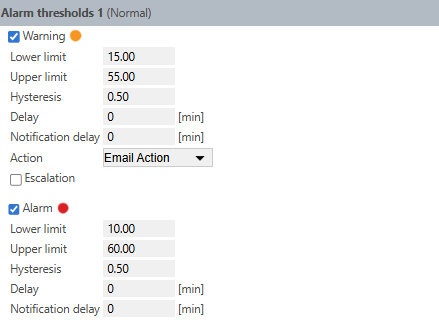 |
|
Alarm threshold 2 |
When the user selects warning and alarm tick box under alarm threshold 2 then the user has various options for both warnings and alarms: •Lower limit: User configured low limit. •Upper limit: User configured high limit. •Hysteresis: User configured hysteresis. Understanding Hysteresis. •Delay: User configured delay. •Notification delay: User configured notification delay. •Action: User configured action. Tools>Setup>Actions Explained. •Escalation: Tick box automatically not set but can be user configured. oEscalation level 1: User configured time (in minutes hours or days) and action of the alarm escalation. oEscalation level 2: User configured time (in minutes hours or days) and action of the alarm escalation. oEscalation level 3: User configured time (in minutes hours or days) and action of the alarm escalation.
The escalation will not be used if no delay time is entered. 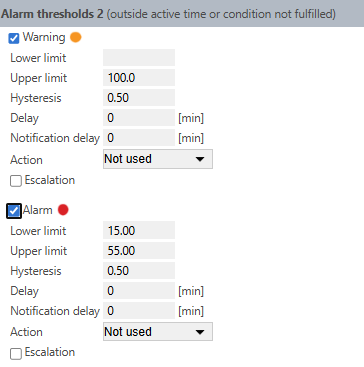 |
|
Update V2.9.1 |
When a user logs into RMS beeing in a different time zone then the RMS system time is, an User time zone is displayed additionally at Tools > Setup > Alarm Scheme: 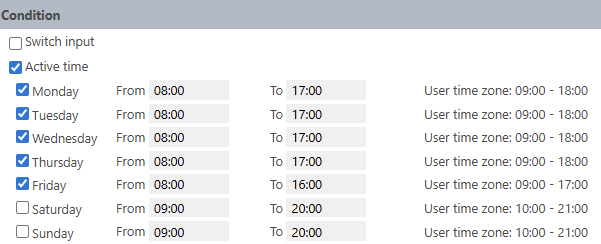
|

Updated: 20.05.2026