Accessing HL-1D, TL-1D, BL-1D
Connect the logger via USB Cable to the PC and open HW5.
Click on Devices and groups -> Search for master devices -> USB masters
Simultaneously a window opens, which informs you, that a new device was found and asks you whether it shall be added to the device tree.
If you confirm an installation wizard opens and asks you “Would you like to perform the initial configuration for the device?”.
Click on <Yes> and a form named “Initial configuration” opens, where you can input the desired configuration parameters.
Click on <No> and you can set the Initial configuration later on within the device tree.
Initial Configuration
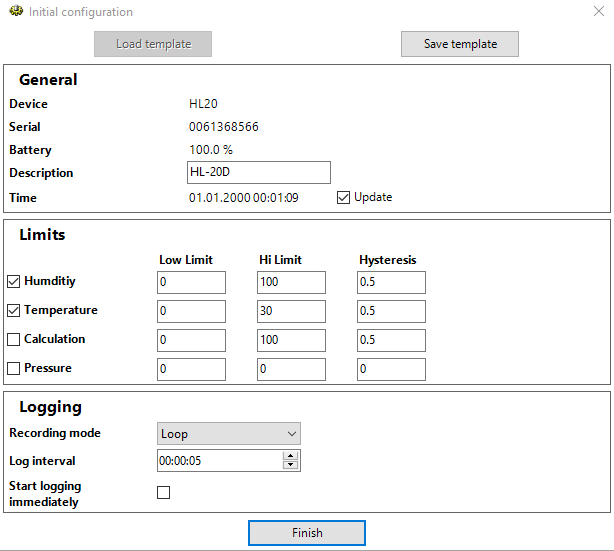
General
Here you get some general information on the device like Device type, Serial Number, Battery capacity, and time. The field “Description” is filled in by default with “Rotronic”. You may change it to a meaningful word with 8 characters max. like “Office-1”. Checkmark “Update” for an automatic synchronization with the HW5 date and time.
Limits
Here you may change preset values for Low and High Limits and Hysteresis of Humidity and Temperature and switch the monitoring of these values on or off.
Logging
Decide whether the Logging Mode is “Loop” (if the memory is full the oldest logs are overwritten by the new log values) or “Stop if full”. Select the Logging interval between 5 seconds and 1 hour in 1-sec-increments. Checkmark “Start logging immediately” to start logging immediately when the wizard is completed. Set a checkmark in the “Lock start/stop key” box to lock the key labeled START/STOP in the front plate of the logger.
A click on “Save template” saves the current configuration data to HW5, “Load template” retrieves them and overwrites the respective entries in the form. This is especially useful to configure a great many of loggers with identical parameters.
Press “Finish” and the entries will be written to the logger.
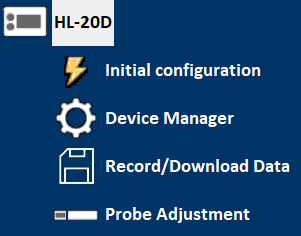
When the initial configuration was successful. Click on the + sign to the left of the icon to expand the device tree. Thereby a list of the available function modules is displayed: “Initial configuration”, “Device Manager”, “Record/Download Data” and “Probe Adjustment”.
For the BL-1D, there are some more configuration as
- General: “Switch display” – Set the time to switch between the measured values (humidity, temperature, ambient pressure) to display.
- Limits: Further limits for ambient pressure
- Logging: Autostart and Autostop
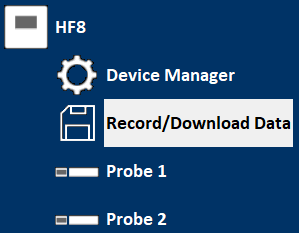
Device Manager
Device Information
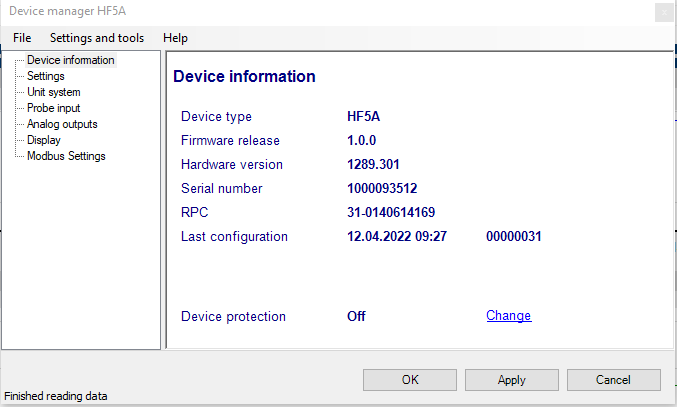
RS485 address: click on the underlined link to change the instrument address to be used in conjunction with an RS-485 network (multi-drop). Each network address should be unique and within the values of 0 to 63.
Note: the default factory RS-485 address is 0. Unless necessary, do not manually modify this address. HW4 will automatically change the RS-485 address of the device, if so required.
Battery: battery status is simplified by following explanations
Good 90 to 100 %
Normal 15 to 90 %
Poor 0 to 15 %
Device Protection: for a description of this function, see document General HW5 feature
FORGOT THE PASSWORD? - Power down the device. After powering up the device, you have about one minute to use the default password !resume! (include the exclamation marks). After one minute the default password will be no longer accepted.
Device Manager Menu Bar
The Device Manager menu bar is located at the top of the form.
File
The file menu is used to save to the PC, or to retrieve from the PC, the configuration settings of the device. The settings are saved in an XML file with the extension DAT. Saving the configuration settings to a file is useful for several reasons:
•provides a backup when the device configuration has been changed in error
•provides a means of quickly configuring a replacement device in the exact same manner as the original device
•provides a means of quickly configuring a number of identical devices
Open: opens the device configuration folder specified in HW5 Global Settings - File Locations Tab - and displays all available probe and device configuration files (extension DAT). Select the appropriate file and click on Open in the explorer form. The contents of the configuration file are loaded to the Device Manager form. Review the contents of the Device Manager sub-forms. Click on the Device Manager OK button to write the configuration settings to the device or click on the Cancel button to leave the device unchanged.
Save As: saves the current configuration to an XML file with the extension DAT) in the device configuration folder specified in HW5 Global Settings - File Locations Tab. If so desired, any directory and any file type may be specified.
Tools
Firmware Update: This tool is used to update the firmware of the device after downloading a new firmware file from the ROTRONIC website to your PC. Firmware files are given a name that shows both to which device the file applies and the version number of the firmware. All firmware files have the extension HEX or ROF. The ROTRONIC website will publish firmware updates as required. The tool opens a form that allows you to specify the folder where the firmware update file is located and to select the file. Click on OPEN to start the update process.
IMPORTANT: the device must be powered during the entire process. Loss of power when the transmitter is being updated may have unexpected results and prevent future operation of the HygroLab C1.
Generate Protocol: generates a Device Configuration Protocol. This text file is automatically saved in the folder specified in HW5 Global Settings - File Locations Tab. If so desired, any directory and any file type may be specified. This action is not recorded in the User Event file.
Settings
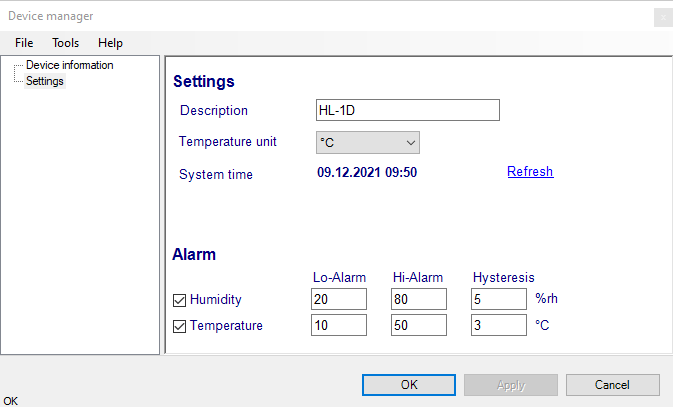
Settings
Description: As far as possible use a unique device name (maximum 8 characters)
Temperature unit: Click on drop down menu and select the temperature engineering unit (˚C or ˚F).
System Time: Click on the blue link labeled “Refresh” to set the data logger internal real time clock to the date and time of the PC.
Switch display (BL-1D only): Set the time to switch between the measured values (humidity, temperature, ambient pressure) to display.
Alarm
Depending on the data logger model, alarm conditions can be defined for the measured/calculated units. Values that are below the low alarm value or above the high alarm value will trigger an alarm. The value specified for the alarm function hysteresis is used for both the low and the high alarm.
The alarm function is activated by clicking on the box next to humidity or temperature. The check mark shows that the alarm is activated.
This function applies only to the data logger display (a red LED flashes and either Hi or Lo appears on the display below the parameter unit symbol). No alarm appears in HW4.
Note: If °C is changed to °F (or oposide), the values fort he alarm trigger will not change together. That might be done by hand.
Data Recording
Data Recording is used to configure the data recording functions of the device, to start and stop data logging by the device and to download the recorded data to the HW5 PC.
To select Data Recording, click on it with the left mouse button. HW5 opens the Data Recording form.
Data logging - Settings
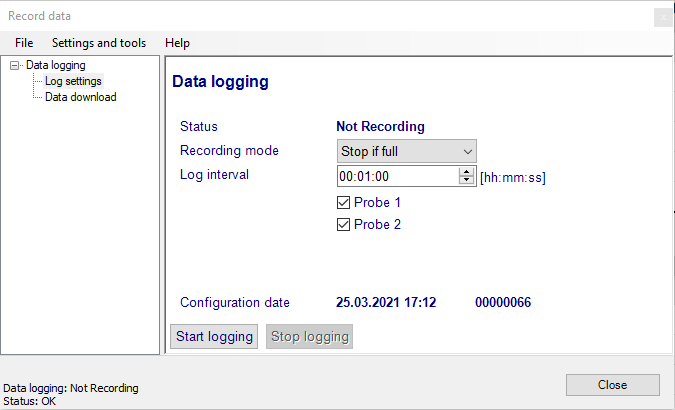
This form is used to select the following:
Recording mode:
- Stop if full: ends the recording when the memory is full
- Loop: when the memory is full, keep recording and dump the oldest data record
Log Interval: 30 seconds to 23 hours 59 Minutes in 1 second increments.
Start recording: click on this link to start recording data
Write setting to device: click on this link to write the recording settings to the data logger
When the recording is started the data logging form changes.
Stop recording: click on this link to stop recording data immediately and the “Data Logging - Record Data” form reappears.
TL-1D & HL-1D
Status:
Recording – Device logs
Not recording – Device doesn’t log
Recording mode: Click on the drop down menu.
Stop if full – device logs until the memory is full.
Loop – device logs in a permanent mode. If the memory is full, the oldest value will be deleted while the newest is logged.
Log interval: The minimum is every 30sec.
Lock start/stop key: Set / remove a checkmark to lock / unlock the Start-Stop key on the device. In case of a locked Start-Stop key, the user cannot interrupt the logging by pressing the button.
Data samples: The number of measured intervals within the memory.
Start recording / Stop recording: The logging function can be enabled or disabled by a mouse click.
Write settings to device: The configuration set will be written into the device by a mouse click.
BL-1D
Status:
Recording – Device logs
Not recording – Device doesn’t log
Recording mode: Click on the drop down menu.
Stop if full – device logs until the memory is full.
Loop – device logs in a permanent mode. If the memory is full, the oldest value will be deleted while the newest is logged.
Log interval: The minimum is every 30sec.
Lock start/stop key: Lock / unlock the Start-Stop key on the device.
In case of a locked Start-Stop key, the user cannot interrupt the logging by pressing the button.
Auto start and Auto stop: Enable / disable the Auto Start and/or Auto stop function.
If the checkmark is set, a start and a stop time of the logging function can be programmed.
Data samples: The number of measured intervals within the memory.
Start recording / Stop recording: The logging function can be enabled or disabled by a mouse click.
Write settings to device: The configuration set will be written into the device by a mouse click.
Data Logginig - Data Download
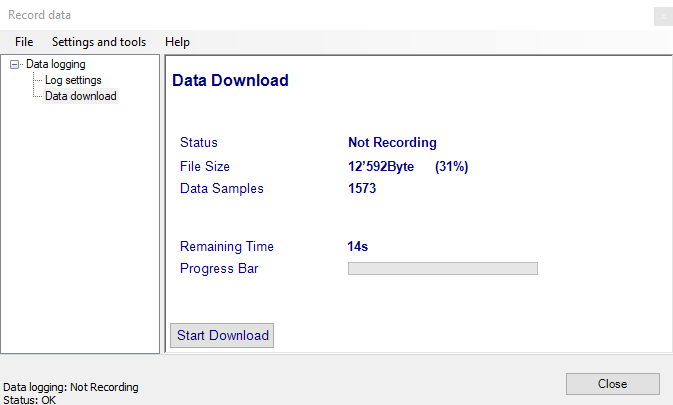
This form is used to download to the PC the data present in the data logger memory. The file can be downloaded even when data is still being recorded.
Notes:
o The file format (text file - .txt or binary - .log) used by HW5 when saving the data to disk can be configured from the menu bar of the Data Logging form: Settings and Tools > Log File Format
o HW5 can print a protocol of the Data Logging settings: Settings and Tools > Generate Protocol
Download Data: click on this link to download and view the recorded data
Enter a file name when the following form opens and click on “Save”
A green progress bar indicates the status of the download. The form disappears when the download is finished and the data saved in the specified file.
“Download time” gives an estimation of the remaining download time.
After saving the data, HW5 automatically opens HW5 Data View
Clear memory: click on this link to erase the logger memory prior to a new recording. The Data samples counter is thus reset to 0.
Adjustment
Humidity adjustment: The HL-1D and BL-1D allows a 1-point adjustment of relative humidity (offset).The “Adjust humidity” form displays the currently measured humidity value.