NOTE: See Installation Guide S904D on how to install the S904D software.
Connecting and Starting the S904D Software
Connect the S904D to the computer, by using the USB cable or through the RS232 port.
Start the LabVIEW® software, by clicking on S904D Control.exe (standard location: C:\
Program Files\Michell Instruments\S904D Control Program).
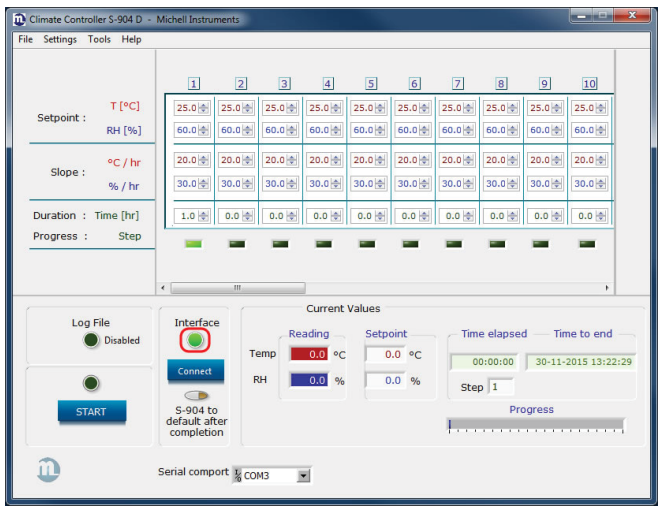
Select the used com. Port, and click on Connect.

Click on OK to confirm.
Once the connection is established, the green interface light will come on.
LabVIEW® Software Menu Structure
This section covers the navigation of the LabVIEW® software.
Command - File

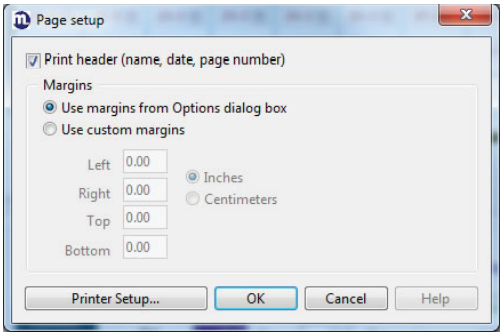
Page Setup
A print header containing the name, date and page number can be added to the file for printing.
The print margins can also be changed.
Print Window
If required for reporting purposes a screen shot can be printed by clicking on Print Window.
Exit
To close the program click on Exit.
Command - Settings
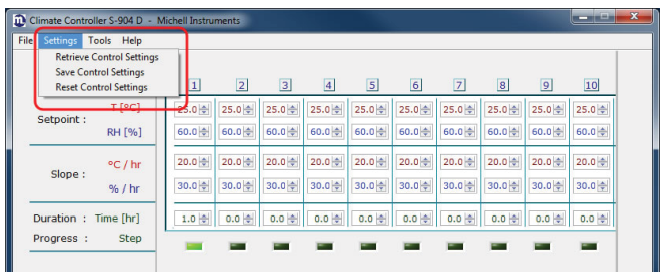
RETRIEVE CONTROL SETTINGS
To load a (previously) saved setpoint settings fi le click on Retrieve Control Settings.
Save Control Settings
All setpoint settings can be saved by clicking on Save Control Settings. The file can then be
saved under a unique name.
Reset Control Settings
By clicking on Reset Control Settings, the connection with the control sensor in the
calibration chamber will be disconnected. All setpoint settings will be then be set back
to factory settings.
Command - Tools
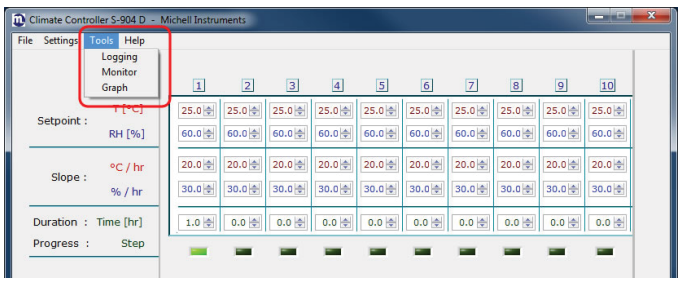
Logging
During the different conditions generated in the chamber, all data can be saved to the
log file.
A maximum of 6 channels can be logged, plus the internal reference probe with
temperature and relative humidity.
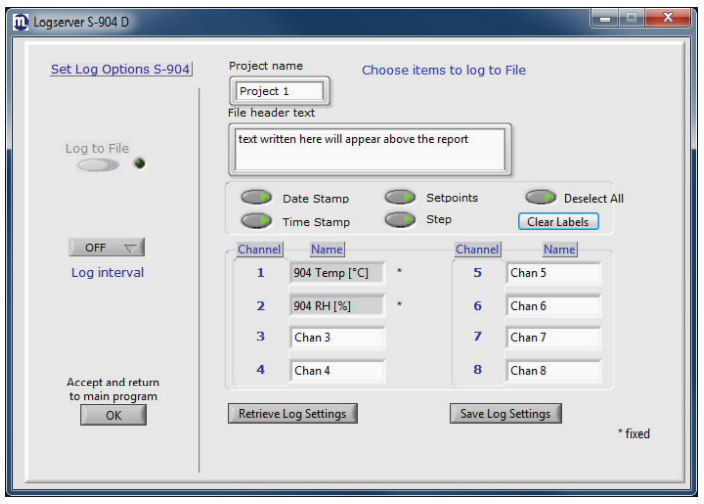
Project name
Type the name of the project.
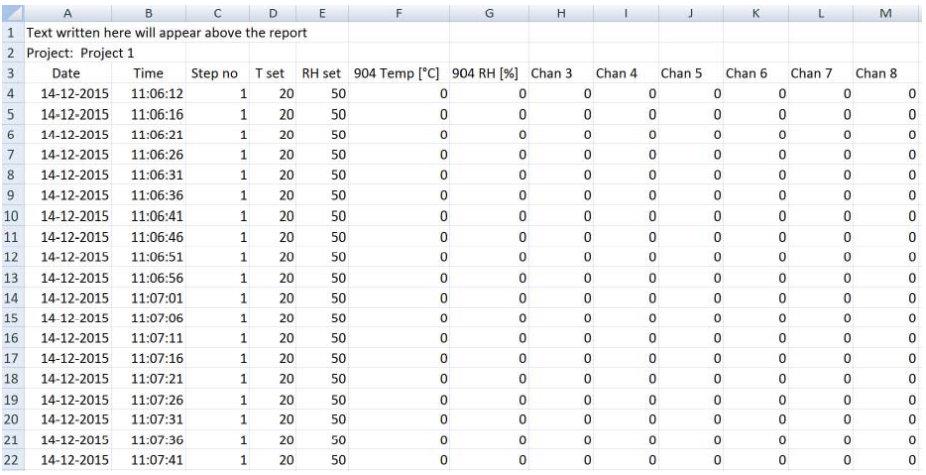
File header text
Text written here will appear above the report.
The following data can also be logged :
Date stamp
The date from the PC where the log fi le is saved to will be used.
Time stamp
The time from the PC where the log fi le is saved to will be used.
Setpoints
The temperature and humidity setpoint chosen by the user in LabVIEW®.
Step
A total of 32 setpoint steps can be chosen. All steps are numbered from 1 to 32. The
actual step number (setpoint) can also be logged here.
Select / Deselect All
Date stamp, Time stamp, Set points and Step will / will not be logged.
Default / Clear Labels
Sets / clears the channel names to their defaults: Chan3, Chan4, Chan5, Chan6, Chan7,
Chan8.
NOTE: Channels 1 and 2 are dedicated channels and cannot be changed.
Save Log Settings
All log settings can be saved by clicking on Save Log Settings. The fi le can then be
saved under a unique name.
Retrieve Control Settings
To load a (previously) saved log settings file click on Retrieve Log Settings.
Log interval
Click on Log interval - a new window appears. Select the logging frequency.
Log to File
Type the name for the log file. The name and path will be visible at the bottom of the
log settings window.
Accept and return to main program
Use this button to leave the log settings menu and return to the main program.
To accept all new settings, click on OK.
The green Log file light will come on.
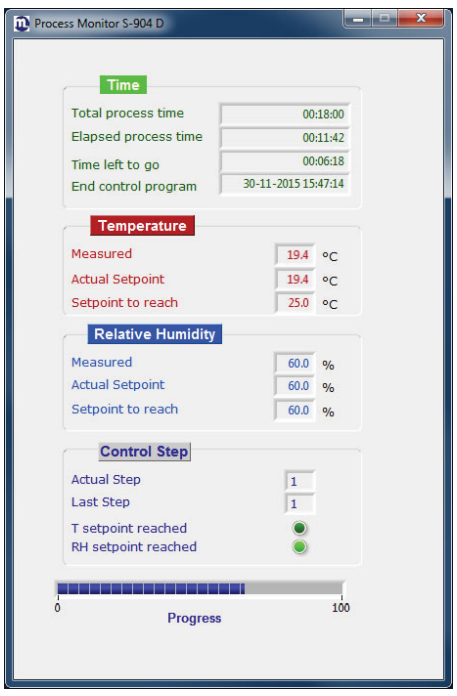
Monitor
Ones the program is running it is possible to open a new window: Process Monitor.
This window will display the status of humidity, temperature, setpoints and time.
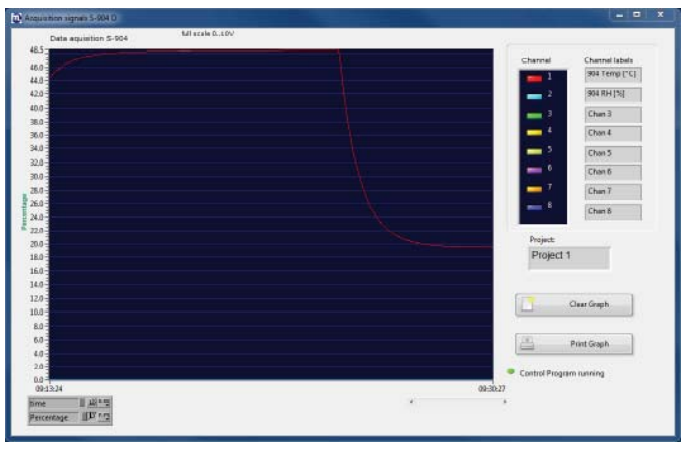
Graph
This option opens a new window showing the logged data in a graph.
Command - Help
About
Click on About to find the software version number.
USB Interface driver
Click on the USB Interface driver to install the CP210x USB to UART Bridge Driver (see
S904D Controller Installation Guide).
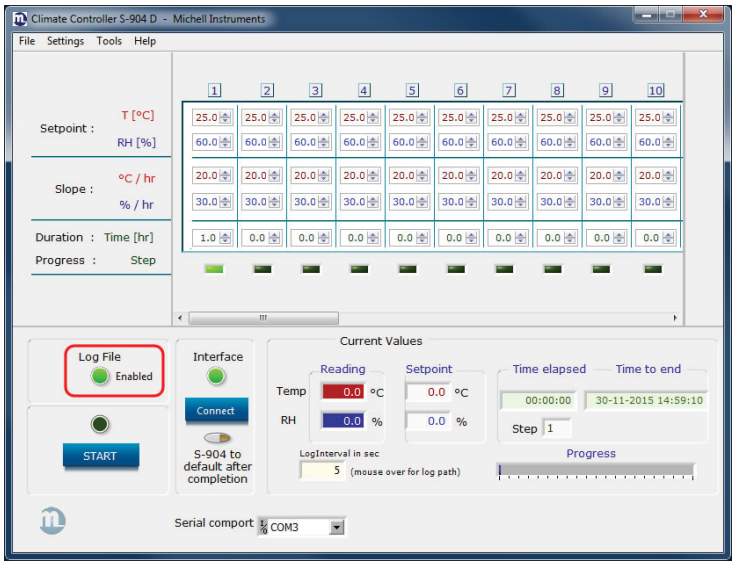
LabVIEW® Software User Interface
The user interface consists of several sections.
Up to 32 set points can be programmed by the user.
Only 10 are visible - use the scroll-bar to show the other 22.
Setpoint
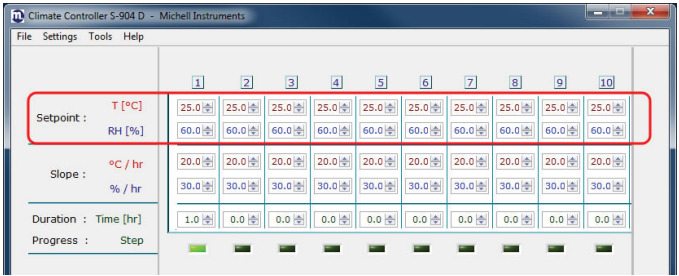
Use the up and down arrows or type the desired set point value for temperature and/or
humidity in the corresponding box.
Temperature range: 0.0 to 75.0°C
Humidity range: 0.0 to 99.5%RH
Slope
Slope determines how fast the S904D will go from one setpoint to another setpoint.
Use the up and down arrows or type the desired value for the slope of temperature and/
or humidity in the corresponding box.
Slope Temperature range: 0.0 to 99.9°C/hr
Slope Humidity range: 0.0 to 999.9%RH/hr
A slope of 0 means the setpoint will not change.
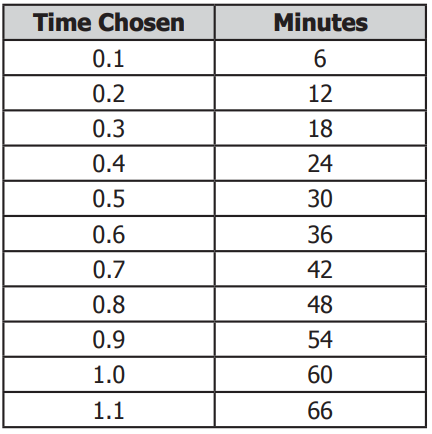
Duration
Duration represents the time that the control reserves for one pair of setpoints (RH
+T). This time includes the Ramp time
.
The control will proceed with the next program step if this time has elapsed. This is also
true when a certain setpoint is not achieved. The program could otherwise be stalled
by one extreme setpoint.
When the duration setpoint is set to 0 the LabVIEW® software will automatically go to
the next setpoint.
The value that is selected is directly related to an hour.
For example: if the time chosen is 0.9 this is calculated as 0.9 x 60 minutes =
54 minutes.
See below for a quick reference chart.
Progress
A green light will show the actual setpoint.
Start
Press the start button to start the program and / or logging.
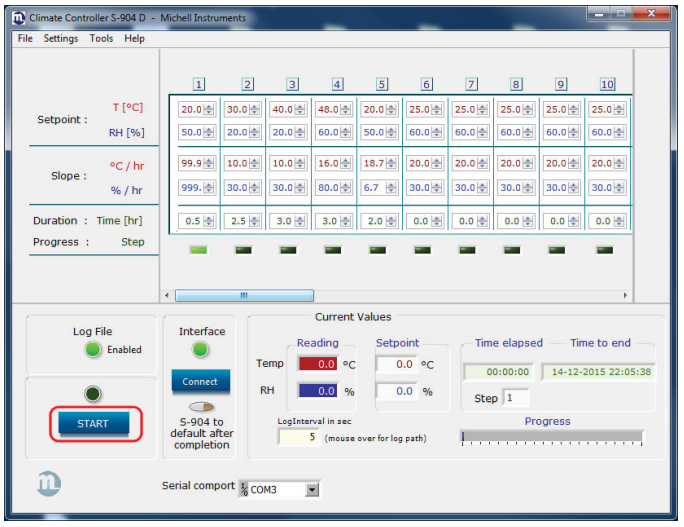
Click on OK to start the process.
The process starts and the green light will come on.
The program runs all setpoints sequentially. After the last setpoint the program stops.
Click on OK to finish.
Log file
The log file is a comma separated fi le. When it is loaded into Excel it will look like this:
Actual Values
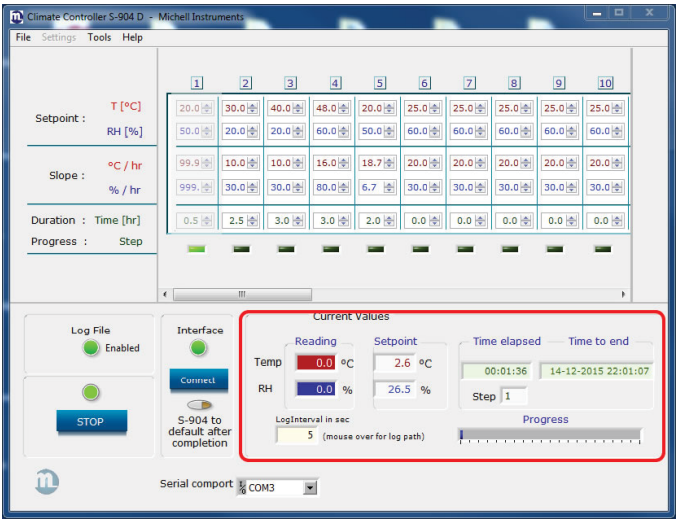
The overview with the momentary values shows:
Reading
The reading of the internal reference probe, temperature and relative humidity.
Setpoint
The actual setpoint.
Time elapsed / Time to end
The time elapsed so far and the estimated time to the end of all steps.
Step
The actual step (maximum of 32) that the software is in.
Progress
A bar showing the progress of the steps
S904 to default after completion
Normally when the S904D Control program is finished the logging stops and the last
setpoints remain active until the S904D is switched off.
If, for example, the last setpoint was 10°C, the S904D remains cooling until it is switched off.
To avoid a long period of time between switching off the S904D and the end of the
S904D control program there is a default after completion button.
Activation of this button creates an additional setpoint of ±20°C and 50%RH after the
program is fi nished. (These values will not be logged).
This additional setpoint remains active until the S904D is switched off.
The orange light will come on.
Example of a test program:
1 stabilize the chamber for 30 minutes at 20°C and 50%RH.
(assuming the S904D starts at ambient temperature and
humidity ±20°C/±50%RH).
2 go in 1 hour to 30°C and 20%RH, and stabilize for 1.5 hours.
3 go in 1 hour to 40°C and 20%RH, and stabilize for 2 hours.
4 go in 0.5 hours to 48°C and 60%RH, and stabilize for 2.5 hours.
5 go in 1.5 hours to 20°C and 50%RH, and stabilize for 0.5 hours.
6 End.
Action needed :
1 Set temperature setpoint to 20.0°C, set humidity setpoint to 50%RH.
Set slope for temperature to 99.9
(the S904D will go to the T-setpoint as fast as possible).
Set slope for humidity to 999.9
(the S904D will go to the RH-setpoint as fast as possible).
Set duration time to 0.5 hour (stabilize for 30 minutes).
2 Set temperature setpoint to 30.0°C, set humidity setpoint to 20%RH.
Set slope for temperature to 10.0
(Ramp time = 1 hour, delta T=10°C => slope = 10°C/hr).
Set slope for humidity to 30.0
(Ramp time = 1 hour, delta RH=30%RH => slope = 30%RH/hr).
Set duration time to 2.5 hour
(1 hour Ramp time + 1.5 hours stabilize time).
Ramp time is the time in which the S904D goes from one setpoint to another setpoint.)
3 Set temperature setpoint to 40.0°C, set humidity setpoint to 20%RH.
Set slope for temperature to 10.0
(Ramp time = 1 hour, delta T=10°C => slope = 10°C/hr).
Set slope for humidity to 30.0
(no Ramp time for humidity, use standard slope).
Set duration time to 3.0 hour
(1 hour Ramp time + 2 hours stabilize time).
4 Set temperature setpoint to 48.0°C, set humidity setpoint to 60%RH.
Set slope for temperature to 16.0
(Ramp time = 0.5 hour, delta T=8°C => slope = 16°C/hr).
Set slope for humidity to 80.0
(Ramp time = 0.5 hour, delta RH=40%RH => slope = 80%RH/hr).
Set duration time to 3.0 hour
(0.5 hour Ramp time + 2.5 hours stabilize time).
5 Set temperature setpoint to 20.0°C, set humidity setpoint to 50%RH.
Set slope for temperature to 18.7
(Ramp time = 1.5 hour, delta T=28°C => slope = 18.7°C/hr).
Set slope for humidity to 6.7
(Ramp time = 1.5 hour, delta RH=10%RH=> slope = 6.7%RH/hr).
Set duration time to 2.0 hour
(1.5 hour Ramp time + 0.5 hours stabilize time).
6 For setpoint 6 to 32:
Set temperature setpoint to 25.0°C, set humidity setpoint to 60%RH
(standard setpoints).
Set slope for temperature to 30.0
(no Ramp time, use standard slope).
Set slope for humidity to 30.0
(no Ramp time, use standard slope).
Set duration time to 0.0 hour
(= standard, this setpoint will be skipped).
