<< Click to Display Table of Contents >> Navigation: Water Activity Devices > HYGROLAB > Step-by-step (first use) |
Step 1 |
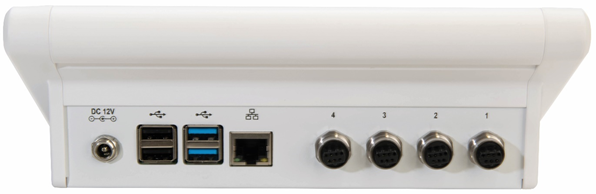
Connecting the HygroLabAfter taking out the HygroLab, take the power adapter and connect it to the DC 12 V connector of the HygroLab. Then connect the chosen probes (up to 4 probes) in the HC2 connectors. For internet access, put the Ethernet cable into the Ethernet port and connect it to the right modem or port.
|
||||
Step 2 |
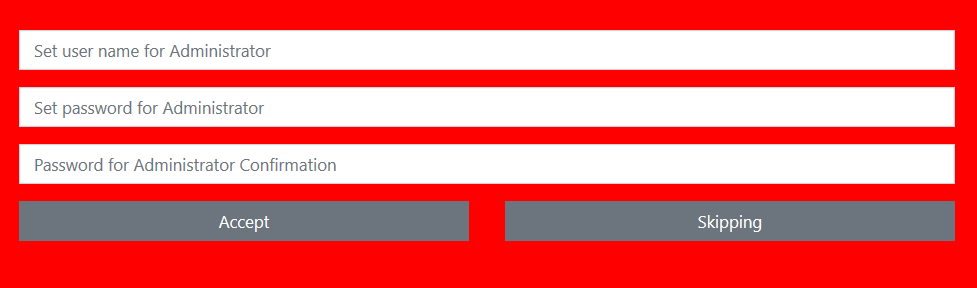
Starting-up the HygroLab for the first timeAfter connecting all cables and probes, the HygroLab is now ready to start. When starting-up the HygroLab for the first time, the Login screen will appear automatically. The system requires the user name and the password for the administrator. By setting the password for the first time, the system requires a confirmation.
|
||||
Step 3 |
Checking out for a new software version
The next step after setting the administrator is to check out for a new software version. For the HygroLab to work efficiently, it is very important to always have the newest firmware version.
Go to "Main menu" > "Settings" > "Device settings" > "Device settings" > select "Update software version" to check if a new firmware version is available.
NOTE: To check if there is a new software version available, the HygroLab needs to be connected to the internet. |
||||
Step 4 |
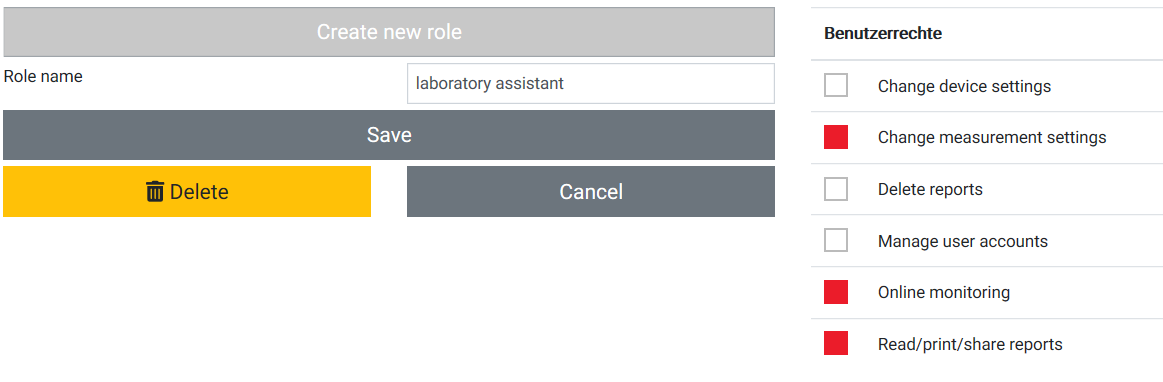
Setting users & rolesFor a safe use of the HygroLab, it is important to set specific users and to define their roles. To do that, go to "Main menu" > "Settings" > "Users & roles".
From there, go first into "Role management" and create a new role (e.g. laboratory assistant, food inspector, etc.). Then choose the user rights for each role. These user rights will determine what rights each user will have based on the role they are assigned in the system (e.g. delete reports, change measurement settings, etc.).
The next step is to create a new user. Go back to "Users & roles" and select "User management".Enter a user name, a first and last name and a password. If needed, it is also possible to limit the time for a selected user by including the end date in the "Valid until" section.As soon as all information is filled out, chose the right role assignment (on the right side of the screen). |
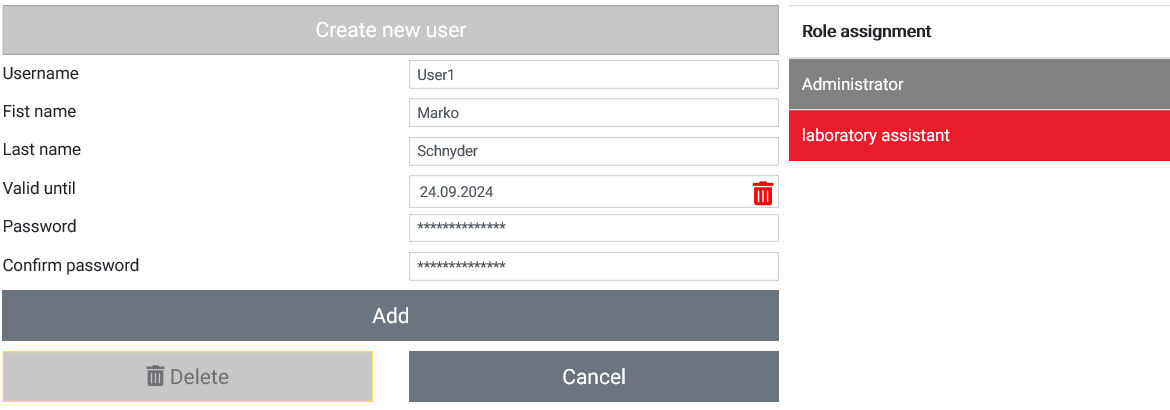
Step 1 |
After Login in the HygroLab select in the "Main menu" > "Measurement" to get an overview of all current measuring. In this menu it shows all important information of the current measuring (Sensor, Temperature, relative Humidity (RH) and water activity (AW)).
In the overview it's possible to "start all available measurements" which are connected to the HygroLab. Contrariwise it's also possible to "stop all running measurements" at once.
The lower menu is always in place and represents the each sensor ports (1 to 4 from left to right). Each connected sensor has 3 different options to select.
Select "Measurement Data" to go in the measurement submenu to select the right measuring option.
NOTE: By adding a new measuring the old measuring are deleted only in the current measurement data, the report of the old measurement is always saved as a document in the measurement documents. |
|||||||||||||||
Step 2 |
After selecting in the lower menu the required probe the option "Measuring Data" a submenu will open up. This submenu is build up with two sides. The left side shows always the measuring information and the right is configurable with options on the right side of the screen.
In the measuring submenu there are 5 different options to choose.
The most important option for the measuring is the "Measurement method", there you can not only choose the measuring method also the set up for the measurement. |
|||||||||||||||
Step 3 |
After selecting the option "Measurement method" there are 2 different method which can be chosen to measure water activity. The "AWE" mode is the exactest measure method and the "AW Quick" mode is the fastest method.
AWE mode: The HygroLab waits for the full equilibration of the measured product and probe. For most products, this takes from 30 to 60 minutes. The HygroLab automatically detects equilibrium conditions (humidity and temperature) and ends the measurement at that time by showing in the measuring data a green OK. The HygroLab displays a trend indicator to the left of the temperature and the aw value.
AWE Quick mode: The HygroLab uses an algorithm to accelerate the water activity measurement and provides a result in typically 5 minutes. The measurement ends automatically and it shows then a green OK in the measuring data. When temperature conditions are stable (both at the product and probe), the value measured with the AWE Quick mode is generally within ± 0.005 Aw of the value that would be obtained by waiting for full equilibration of the product and probe.
Using the AWE mode Go into the measurement method and select the AWE. Then specify the tolerance of the equilibration (temperature and water activity) with the Stab.T and the Stab.AW parameters. When all these parameters are fulfilled the measurement will end.
•Define the stability of the temperature per minute Stab.T: 0.01 (°C / °F) [/min] → Our recommendation
•Define the stability of the water activity per minute Stab.AW: 0.0001 [/min] → Our recommendation
NOTE: Lower numbers for the Stab.T and the Stab.AW ensure more accurate results but causes measurements to take longer.
Using the AW Quick mode To use the AW Quick mode the procedure is almost the same as the for the AWE mode. There is no setting of Stab.AW (stability of the water activity) instead there is Dwell time. The value of the Dwell time can be set by the user and is a tradeoff between speed of measurement and accuracy. We recommend for the Dwell time of 3-4 minutes and a Stab.T of 0.1 (°C / °F) [/min]. Generally, a longer Dwell time produces more accurate results but causes measurements to take longer. The Dwell time also strongly depends on the sample which releases moisture in the environment faster or slower. The user needs to adjust for example a higher dwell time in case of a sample with a slower release of moisture.
NOTE: After changing the settings select "Save" to adopt the new settings.
Recommended values overview: Please note that this recommended values only applies for measurement in stable and air-conditioned rooms resp. laboratories (at 23°C ±5°C).
NOTE: During the measurement the climate condition needs to be stable. Unstable condition makes the measurement unnecessary longer (mostly for the AW Quick function) and inaccurate. |