Date / Time Setup
When device is powered on, hold down “SET” key for 2 seconds until entering device setup mode. Press “UP” or “DOWN” key to select the program (P 50, displayed in right-middle panel) and press “SET” key to enter.
First, choose the time format as 24 hour or 12 hour by press “UP” or “DOWN” key and then press “SET” key to confirm. Now, start to input the real time clock value from year, month, day, hour to minute. Press “UP” or “DOWN” key to adjust and the press “SET” key to confirm.
After the date and time are set, a clearance of the memory must be performed. Press “UP” or “Down” key to select P 10 and press “SET” key to enter P11. Press “UP” or “Down” key to choose “YES” to clear previous memories and press “SET” to confirm. Then, press “ESC” key twice to return to normal mode.
Unit Setup
Hold down “SET” key for 2 seconds until entering meter setup mode. Press “UP” or “DOWN” key to select the program P 30 and press “SET” key to enter. Press “UP” or “DOWN” key to select °F or °C and the press “SET” key to confirm. Press “ESC” key to return to normal mode.
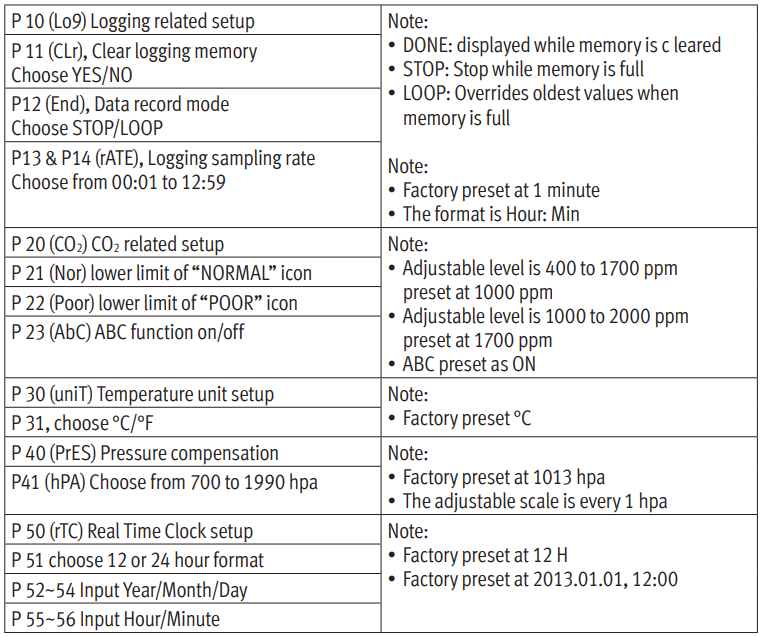
Instrument Settings
Hold down “ SET” key for more than 2 seconds until entering setup mode. To exit setup, press “ESC” to return to normal mode. The available meter setup program are shown in below. Press “UP” or “DOWN” key to select the program (P10, P20, P30, P40 or P50) in main menu and press “SET” key to enter sub menu. Press “SET” key to select different sub menu (P11, P12, P13 or P14), programmable setting then flashes on panel. Press “UP” or “DOWN” key to adjust and press “SET” to confirm. To leave without saving, press “ESC” key to return.