Switching on
1. Ensure the electrical mains supply is correctly plugged in and switched on.
2. Switch the unit on by pressing the ENTER button once.
3. The fans within the unit will switch on giving an immediate audible indication the unit is powered.
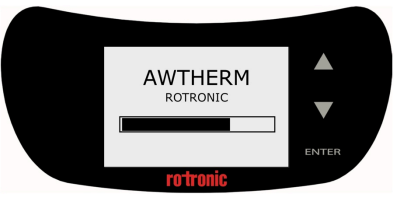
4. The loading screen will display.
5. The controller will power up and display the Top Level screen.
On power up:
• The temperature set-point defaults to the last set value.
• The temperature control defaults to automatic mode (controlling the temperature).
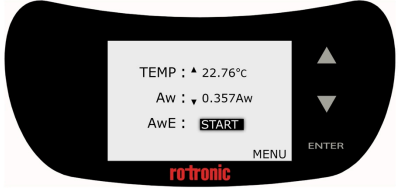
AwTherm Interface
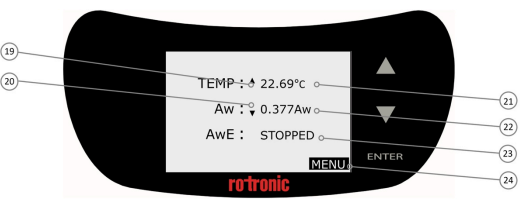
19) Temperature trend indication
20) Aw trend indication
21) Temperature field
22) Live Aw reading
23) Status field
24) MENU
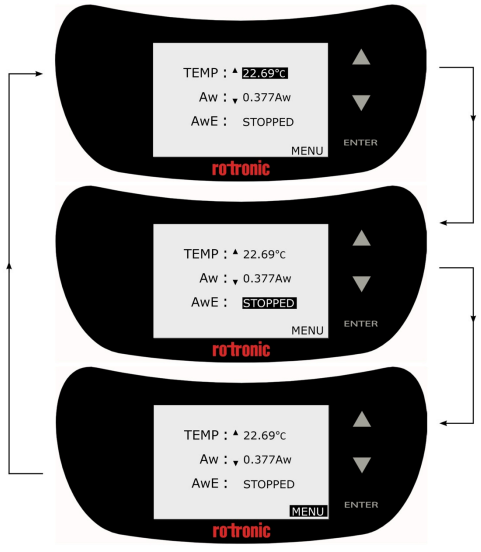
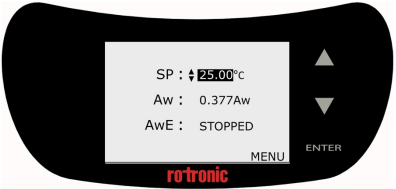
Basic Navigation
The AwTherm interface consists of a Top Level Screen with 3 fields which can be manipulated: (set point) temperature, status, and device settings (Menu). Pressing the up or down arrow scrolls through each of these, highlighting each one in turn. To select one, press the ENTER button. The field will flash, and the functionality activated.
Main Menu
There are a number of AwTherm system and program settings that can be configured. To access
the settings, select MENU and press the ENTER button.

NB For all menus and sub-menus, to return to the previous screen, scroll down to the RETURN field and press the ENTER button.
Any adjustable parameter can be selected using the UP/DOWN and ENTER touch buttons in the same manner as described for basic menu navigation. The parameter can be adjusted using the UP/DOWN buttons and set by pressing the ENTER button.
Please note, by pressing and holding the up or down arrow keys, the speed of any numeric incrementation will increase (autoscroll).
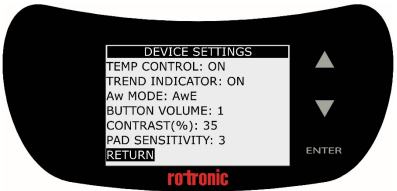
AwTherm Settings
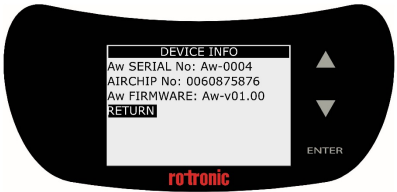
I) Device Info displays the serial numbers of the unit itself, the AirChip Sensor and the firmware version that the AwTherm is running.
II) Device Settings; Enable or disable temperature control (on by default), disable the Trend Indication for temperature (19) and Aw (20) as shown in Figure 6, and configure the Aw measuring mode: AwE or Aw-Quick (see section , below). Touch buttons can be set to make an audible sound when activated, contrast adjusted (default optimal setting is 35%), and touchpad sensitivity adjusted – from a value from 0-5. Please note, if touch pad has poor responsibly, try each individual setting in turn until best results achieved.
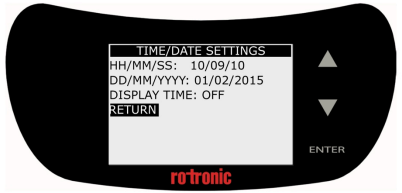
III) Time/Date Settings; Date and time can be set and displayed on the AwTherm (off by default). Time/date is only displayed for convenience and is not used a part of data logging and therefore is
not crucial to the operation of the instrument. Data logging is performed using Rotronic HygroSoft software running on an external PC.
Please note the date format [DD/MM/YYYY] is fixed and cannot be changed.
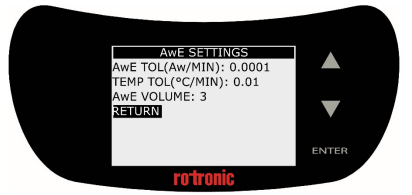
IV) AwE Settings; the AwE Tolerance, Temperature tolerance, and process complete audible beep volume can be configured here. Further details regarding AwE measurement mode are found down below.
Select the Update Firmware field and change the NO to YES using the up or down arrow keys and press ENTER. There is also an indication of the internal CMOS battery condition.
Setting the AwTherm Set Point Temperature
With the Temperature Control parameter turned on, and the lid closed, the AwTherm will control the temperature of the sample chamber environment. The heat pump controls the temperature of the air which is circulated through the airflow sleeve around the outside the walls of the sample chamber.
To set the temperature, from the Top Level screen, use the up and down arrows to select the Temperature parameter. Press ENTER; the temperature parameter will flash and the label will change to SP (set point).
Use the UP/DOWN touch buttons to adjust the value to the desired temperature and press ENTER to accept it.
AwTherm will now control the temperature of the chamber to the new temperature. The time it takes for the chamber to reach the temperature will depend on the ambient conditions, and the initial and set point temperatures. Depending on the magnitude of the temperature change required, the instrument will slightly overshoot, before coming back and stabilizing. The Trend Indicator will show whether the unit is heating or cooling. When stable (to within the defined AwE/AwQ temperature tolerance) the Trend Indicator will display up and down indicators simultaneously.
Note that the chamber will reach a stable set point temperature before the sample, depending on the initial temperature of the sample.
See Sample preparation: best practices and operational considerations below for further details and advice.
Making Measurements
AwTherm features two modes for measuring water activity.
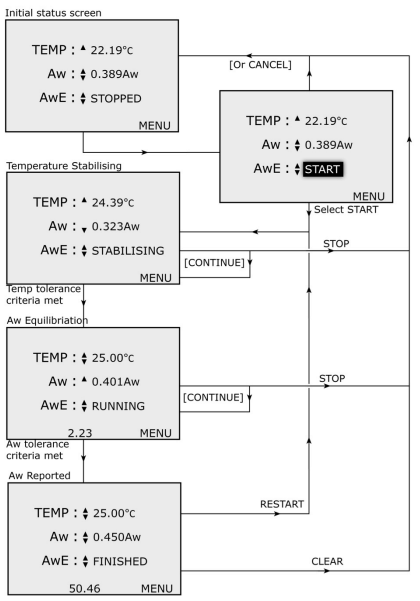
AwE mode:
In this mode AwTherm monitors the stability of both temperature and humidity. The measurement is automatically ended as soon as both humidity and temperature reach equilibrium. The natural (or static) equilibration of most products typically requires from 15 to 60 minutes and can take as long as a couple of hours.
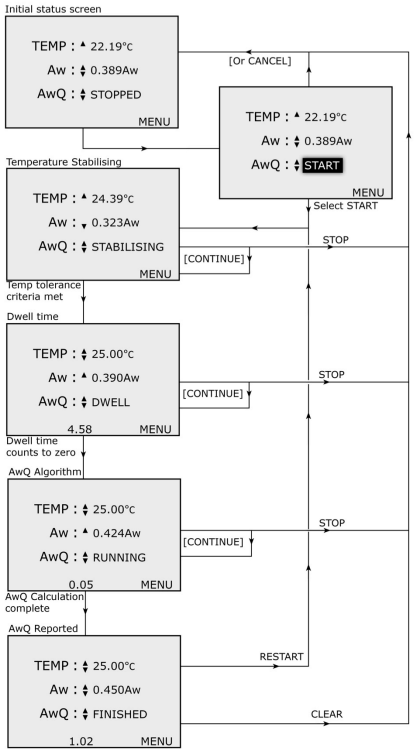
AwQuick mode:
In the AwQuick mode, AwTherm uses an algorithm to project the full equilibrium value (water activity) of the measured product. The measurement is automatically ended and typically requires typically about 5 minutes. AwTherm performs the following tasks:
1)The value of the humidity signal is constantly monitored
2)The stability of the temperature signal is constantly monitored
3)After an initial period of time (dwell time), AwTherm uses the humidity data to project the end value of the equilibration process (water activity). The measurement ends automatically as soon as the projected Aw value is stable.
With the dwell time set to 4 minutes, measurements typically require about 5 minutes. When temperature conditions are stable (both at the product and probe), the measurement obtained with the AwQuick mode is generally within ± 0.005 aw of the measurement that would be obtained by waiting for full equilibration (AwE mode).
Aw mode can be selected in Device Settings as described above. Load your sample into the instrument, following the guidelines as outlined above.
Starting a measurement run
To start a measurement run, at the Top Level screen, select the status field and press ENTER.
Then use the UP/DOWN touch buttons to and select START, and then press ENTER.
The measurement run will now begin.
At the end of the run, the AwTherm will sound an audible beep and hold the values on the screen, displaying FINISHED in the status field.
The following section describes the operation of each mode, AwE and AwQ as a flowchart.
AwE Mode
AwQ Mode
Switching off the AwTherm
To turn off AwTherm, press and hold the ENTER touch button until the Shutting Down screen appears and the progress bar has completed.
To cancel the shutdown process at any time, simply stop pressing the ENTER touch button.